
Introduction
Video downloading on macOS can be frustrating. iTubeGo requires clicking through dialogs; other tools are bloated or unreliable. But what if you could simply right-click on any URL and download it instantly to your Downloads folder?
This guide walks you through setting up a seamless workflow using yt-dlp (the maintained successor to youtube-dl), Automator, and a Quick Action. You’ll support 1,000+ websites including YouTube, Vimeo, Twitter, Instagram, TikTok, and more. Best of all, it’s free and works entirely from the command line.
By the end, you’ll have a system that feels native to macOS—no app windows, no subscription fees, just pure efficiency.
What You’ll Need
- macOS 10.14 or later (Automator built-in)
- Homebrew (free package manager for macOS)
- yt-dlp (video/audio downloader)
- ffmpeg (optional but strongly recommended for format handling)
- deno (optional but recommended for YouTube)
Estimated setup time: 10–15 minutes
Difficulty level: Beginner-friendly
Step 1: Install Homebrew
If you don’t have Homebrew, it takes 30 seconds to install. Open Terminal (find it via Spotlight: Cmd+Space, type “Terminal”) and paste:
/bin/bash -c "$(curl -fsSL https://raw.githubusercontent.com/Homebrew/install/HEAD/install.sh)"Press Enter and follow the prompts. When complete, verify installation:
brew --versionStep 2: Install yt-dlp
yt-dlp is the core tool that handles downloads. Install it with:
brew install yt-dlpVerify it works:
yt-dlp --versionYou should see a version number (e.g., 2025.12.08).
Step 3: Install ffmpeg (Recommended)
ffmpeg handles video re-encoding and format fixes. Many downloads will fail or use suboptimal formats without it. Install it:
brew install ffmpegThis eliminates warnings like “ffmpeg not found” and ensures you get the best available quality.
Step 4: Install deno (Recommended for YouTube)
YouTube requires a JavaScript runtime to extract video URLs properly. deno is the easiest option:
brew install denoThis removes the “No supported JavaScript runtime” warnings you’ll see when downloading YouTube videos.
Step 5: Find Your yt-dlp Installation Path
This is critical for the Automator script. Run:
which yt-dlpCopy the output. On Apple Silicon Macs (M1, M2, M3, etc.), it’s typically /opt/homebrew/bin/yt-dlp. On Intel Macs, it might be /usr/local/bin/yt-dlp. You’ll need this exact path in Step 6.
Step 6: Create the Automator Quick Action
Now the magic happens. Follow these steps carefully:
6.1 Open Automator
Launch Automator (Spotlight: Cmd+Space, type “Automator”).
6.2 Create a New Quick Action
- Select File > New
- Choose Quick Action as the document type
- Click Choose
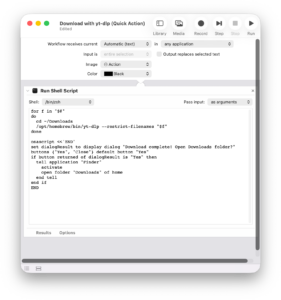
6.3 Configure Workflow Input
In the dropdown at the top, set:
- Workflow receives current:
text(not “files or folders”) - in: Any application
6.4 Add Run Shell Script
- In the left sidebar, search for “Run Shell Script”
- Drag it to the right panel (the workflow area)
- Change the shell dropdown from
/bin/bashto/bin/zsh - Change “Pass input” from “to stdin” to “as arguments”
6.5 Paste the Script
Replace the yt-dlp path if needed. If your which yt-dlp output was different, update /opt/homebrew/bin/yt-dlp accordingly:
for f in "$@"

do

cd ~/Downloads

/opt/homebrew/bin/yt-dlp --restrict-filenames "$f"

done

osascript <<'END'

set dialogResult to display dialog "Download complete! Open Downloads folder?" buttons {"Yes", "Close"} default button "Yes"

if button returned of dialogResult is "Yes" then

  tell application "Finder"

    activate

    open folder "Downloads" of home

  end tell

end if

END
6.6 Save the Quick Action
- File > Save
- Name it
Download with yt-dlp - Save location: default (~/Library/Services/)
- Click Save
Step 7: Test It Out
Using Right-Click (Context Menu)
- Open Safari, Mail, or any app that supports text selection
- Copy a URL from a supported site (YouTube, Vimeo, Twitter, etc.)
- Right-click on the URL or selected text
- Look for Services submenu > Download with yt-dlp
- A notification dialog will appear when done; click Yes to open your Downloads folder
Direct Terminal Test (Optional)
To test before using the Quick Action, try this in Terminal:
cd ~/Downloads
yt-dlp "https://www.youtube.com/watch?v=dQw4w9WgXcQ"
The video should download to your Downloads folder.
Step 8: Add a Keyboard Shortcut (Optional but Handy)
Want to download with a keyboard shortcut instead of hunting through menus? Here’s how:
- Open System Settings (Apple menu > System Settings)
- Click Keyboard in the sidebar
- Scroll down and click Keyboard Shortcuts button
- In the left panel, select Services
- Scroll to find Download with yt-dlp (under “General” or “Text”)
- Click the field next to it
- Press your desired key combo (e.g., Cmd+Opt+Y)
- Close System Settings
Now, anywhere you can select text, press your shortcut to download instantly.
Bonus: Safari Share Sheet Integration
Note: Unfortunately, macOS doesn’t allow custom Quick Actions to appear directly in Safari’s native Share menu. However, you have two workarounds:
Workaround 1: Use Shortcuts App (macOS 12+)
Apple’s built-in Shortcuts app integrates with Safari’s Share menu natively:
- Open Shortcuts app (Applications > Shortcuts)
- Click + (Create Shortcut)
- Search for and add “Open URLs” action
- In the workflow, add a “Run Shell Script” action and paste:
/opt/homebrew/bin/yt-dlp --restrict-filenames "$@" - Click the three dots > Add to Share Menu
- Name it and save
- Now it appears in Safari’s Share menu
Workaround 2: Browser Extension (Safari)
Use a Safari browser extension that sends URLs to Terminal:
- Search the Mac App Store for “Open in Terminal” or similar
- Some let you pipe output to shell commands
For most users, the right-click Quick Action is sufficient and faster.
Troubleshooting
❌ “No such file or directory: /opt/homebrew/bin/yt-dlp”
Run which yt-dlp again and update the path in your Automator script. Your path might be different.
⚠️ “WARNING: ffmpeg not found”
Run brew install ffmpeg. Without it, some videos won’t download or will use poor formats.
⚠️ “WARNING: No supported JavaScript runtime”
Run brew install deno. This fixes YouTube extraction.
❌ “zsh: command not found: yt-dlp”
Your shell isn’t finding yt-dlp. Use the full path (/opt/homebrew/bin/yt-dlp) instead of just yt-dlp in the script.
❌ Download works in Terminal but not in Automator
Ensure you’re using the correct full path from which yt-dlp. Also, make sure you changed the shell to /bin/zsh.
What Sites Can You Download From?
yt-dlp supports 1,000+ sites. Here are the most popular:
| Category | Sites |
|---|---|
| Video | YouTube, Vimeo, Dailymotion, Twitch, Bilibili |
| Social Media | Instagram, TikTok, Twitter/X, Facebook, Reddit |
| Music | SoundCloud, Bandcamp, Spotify (via workaround) |
| Streaming | Crunchyroll, BBC iPlayer, PBS, Hulu (via workaround) |
| Other | Pornhub, xHamster, Tumblr, Imgur, and 900+ more |
For a complete list, check yt-dlp’s GitHub supportedsites.md.
Pro Tips
1. Download Audio Only
Edit your Automator script to add -x --audio-format mp3:
/opt/homebrew/bin/yt-dlp -x --audio-format mp3 --restrict-filenames "$f"2. Custom Filename Patterns
Change the script to use custom filenames. For example, to include the upload date:
/opt/homebrew/bin/yt-dlp -o "~/Downloads/%(upload_date)s - %(title)s.%(ext)s" "$f"3. Create Config File (Advanced)
For power users, create ~/.config/yt-dlp/config with your preferences:
-P ~/Downloads
--restrict-filenames
-f best
--merge-output-format mp4
Then your Automator script becomes just /opt/homebrew/bin/yt-dlp "$f" and loads these defaults.
4. Keep yt-dlp Updated
Run this monthly to stay current:
brew upgrade yt-dlpYouTube and other sites constantly change; staying updated ensures continued compatibility.
Conclusion
You’ve just built a professional-grade download system in under 15 minutes. No app clutter, no subscriptions—just a clean, native macOS workflow.
Next time you find a video you want to keep, simply right-click and download. Your Downloads folder will thank you.
Questions? Run yt-dlp --help for the full command reference, or visit the yt-dlp GitHub wiki for advanced usage.


Leave a Comment